관련지식
javascript, clipboard, Selection, Range
HTML에서 특정 텍스트를 클립보드로 복사하는 3가지 방법을 알아보겠습니다.
첫번째
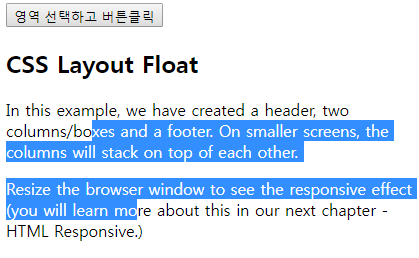
화면에서 사용자가 복사를 원하는 영역을 선택하고 복사 버튼을 클릭했을때 복사하는 방법입니다. 단지 document.execCommand("copy"); 한줄만 사용하면 됩니다.

function copy1() {document.execCommand("copy"); //복사}
복사를 원하는 영역을 선택하고 복사 버튼을 클릭, 메모장 등에 붙여넣기를 해보시면 됩니다.
두번째
첫번째 복사 방식을 생각해보면 ‘텍스트 선택 -> 복사’ 순서로 이루어집니다. 텍스트 선택을 스크립트로 처리할수 있으면, 사용자는 오직 복사버튼 클릭 한번으로 복사를 할수 있겠네요.
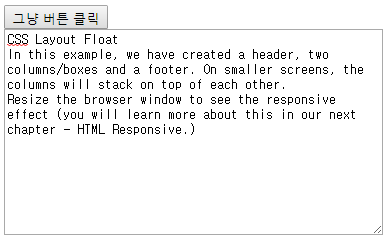
일반적으로 많이 사용하는 방법은 <input type="text"/> 나 <textarea/> 를 이용하여 텍스트를 복사하는 방법입니다.

function copy2() {var obj = document.getElementById("text2");obj.select(); //인풋 컨트롤의 내용 전체 선택document.execCommand("copy"); //복사obj.setSelectionRange(0, 0); //선택영역 초기화}
select() 함수를 호출하여 인풋 컨트롤의 텍스트 전체를 선택하면 됩니다. 복사후에 선택 영역을 초기화 시키고 싶으면 setSelectionRange() 함수를 호출하면 됩니다. 복사기능 자체에 영향을 주는 함수는 아닙니다.
그런데 w3schools 예제에서는 아래와 같이 가이드를 하고 있습니다.
function myFunction() {var copyText = document.getElementById("myInput");copyText.select();copyText.setSelectionRange(0, 99999); /*For mobile devices*/document.execCommand("copy");alert("Copied the text: " + copyText.value);}
모바일 크롬에서는 ‘copyText.setSelectionRange(0, 99999);’ 소스가 없어도 잘 복사되는데 필요한 경우가 있는지… 이건 확인이 필요해보이네요.
참고 : https://www.w3schools.com/howto/howto_js_copy_clipboard.asp
세번째
첫번째는 일반적인 텍스트 태그에서 복사를 했고, 두번째는 인풋 컨트롤을 이용해서 복사를 했습니다. 두번째 방식에서 사용한 select() 함수는 텍스트 전체를 선택하기 때문에 부분 복사를 할수 없습니다. 그래서 이번엔 일반적인 텍스트 태그의 선택영역을 스크립트로 처리 해보겠습니다.

function copy3() {var obj = document.getElementById("text3");var range = document.createRange();range.selectNode(obj.childNodes[0]); //텍스트 정보를 Range 객체에 저장var sel = window.getSelection();sel.removeAllRanges(); //기존 선택정보 삭제sel.addRange(range); //텍스트 정보 선택document.execCommand("copy"); //복사sel.removeRange(range); //선택 정보 삭제}
이 소스를 이해하기 위해선 Selection과 Range에 대한 이해가 필요한데, 아래 링크를 참고 바랍니다.
참고
Selection : https://developer.mozilla.org/ko/docs/Web/API/Selection
Range : https://developer.mozilla.org/ko/docs/Web/API/Range
세번째 방식이 가장 복잡한 소스지만, 가장 좋은 기능을 구현할수가 있습니다. 세번째 방식에선 텍스트의 부분 복사가 가능합니다. 두줄을 추가해보겠습니다.
range.selectNode(obj.childNodes[0]);range.setStart(obj.childNodes[0], 0); //추가range.setEnd(obj.childNodes[0], 5); //추가
다시 테스트를 해보면 텍스트 전체가 아니라 부분만 복사되는 것을 확인하실수 있습니다.
최종샘플
<!DOCTYPE html><html lang="en"><head><title>CSS Template</title><meta charset="utf-8"><meta name="viewport" content="width=device-width, initial-scale=1"><style>body > div {width:30%; display:inline-block; float:left}</style></head><body><div><input type="button" value="영역 선택하고 버튼클릭" onclick="copy1()"/><h2>CSS Layout Float</h2><p>In this example, we have created a header, two columns/boxes and a footer. On smaller screens, the columns will stack on top of each other.</p><p>Resize the browser window to see the responsive effect (you will learn more about this in our next chapter - HTML Responsive.)</p></div><div><input type="button" value="그냥 버튼 클릭" onclick="copy2()"/><textarea id="text2" style="width:90%; height:200px">CSS Layout FloatIn this example, we have created a header, two columns/boxes and a footer. On smaller screens, the columns will stack on top of each other.Resize the browser window to see the responsive effect (you will learn more about this in our next chapter - HTML Responsive.)</textarea></div><div><input type="button" value="그냥 버튼 클릭" onclick="copy3()"/><div id="text3" style="width:90%; ">http://무슨무슨URL</div></div><script>function copy1() {document.execCommand("copy"); //복사}function copy2() {var obj = document.getElementById("text2");obj.select(); //인풋 컨트롤의 내용 전체 선택document.execCommand("copy"); //복사obj.setSelectionRange(0, 0); //커서 위치 초기화}function copy3() {var obj = document.getElementById("text3");var range = document.createRange();range.selectNode(obj.childNodes[0]); //텍스트 정보를 Range 객체에 저장//range.setStart(obj.childNodes[0], 0); //추가//range.setEnd(obj.childNodes[0], 5); //추가var sel = window.getSelection();sel.removeAllRanges(); //기존 선택정보 삭제sel.addRange(range); //텍스트 정보 선택document.execCommand("copy"); //복사sel.removeRange(range); //선택 정보 삭제}</script></body></html>
'javascript' 카테고리의 다른 글
| [javascript] Queue 와 Stack 구현 (0) | 2019.12.09 |
|---|---|
| [javascript] 배열에 다른 배열의 데이터를 추가하는 방법 (0) | 2019.12.06 |
| 브라우저 알림(Notification) 팝업에 버튼 추가 with ServiceWorker (0) | 2019.11.25 |
| 브라우저 알림(Notification) 팝업에 폰트 크기 적용하기 (0) | 2019.11.22 |
| [javascript] var const let 키워드의 차이 (0) | 2019.11.13 |